How to Get Free Ride in Uber

Uber is an on-demand car service that allows you to request private drivers through applications for iPhone and Android devices. The service utilizes dispatch software to send the nearest driver to your location. The service provides a cashless solution that charges your ride directly to the credit card on file with your account.  Uber is a good cab service used in 58 countries including United States, United kingdom, India, china, Brazil, Singapore etc and connected to new cities in every week. 

How to Get Free Ride in Uber

Uber provides the following type of service having different type of cab and variation in fare.

1. UberX : Its Uber's low cost option, allow you to get from Point A to Point B without putting a hurt on your pocket and there can be up to 4 passengers.


2. Uber Black : This is Uber's original service, choosing Black car will send a high end sedan to your location. It is essentially the luxury version of UberX and there can be up to 4 passengers.

3. Uber Taxi – This calls a taxi that has an agreement with Uber. These taxis are much like any normal taxi, except that you can pay through the app.

4. Uber SUV : This is significantly more expensive than the Black Car service with seating up to 6 people.

5. Uber LUX : This will send a high-end luxury car to your location with seating for up to 4 people. This is Uber’s most expensive service.


How to get Free Ride in Uber

Download the Uber App which is available for free from the Apple App Store, Google Play Store and the BlackBerry App world. Install the app on your device and then open it.  You will be asked to create an account. 

Uber will need your name, mobile number, email, language and billing information ( excluding some countries like India ). You must enable location service in mobile and verify your mobile number by using OTP sent to mobile. Once your Uber account is created, login to your account and tap on promotions and enter the promocode RAJENDERM173UE

How to use Free Ride in Uber

Sign in to your Uber account, choose vehicle type and mark your position on the map with a pin or you can set the location by tap the "Set Pickup Location" button. You will be given the option to pay with any Uber credit that you may have on your account like free ride.  

Wait in front of your exact street address for your ride and you will be given an estimation on how long your car will take to show up. 


Common tips

1. Fares are different in every city, so be sure to check the Uber website or use an online fare estimator. All cities have a minimum fare. 

2. Uber charges are based on a combination of time and distance. If the car is travelling under 11 mph (18 km/h), you will be charged by the minute, and if you are travelling over 11 mph (18 km/h), you will be charged by the mile.

3. If you don’t have access to the Uber app, you can request a car through the Uber mobile site or by texting your pickup address and city to UBR222. 

4. The Uber app will provide you with the phone number of your driver. You can use this contact the driver if you have any special considerations.

5. If you need to cancel your reservation, you will be charged a $5-$10 fee if you cancel after five minutes.

6. If there was no car available, try again in a few minutes, as a driver may have dropped their passengers off and become available. 

7. If using the TAXI service, you can select the amount to be tipped through your Uber Payment Settings - the default is 20%. 

8. Uber only recognizes a 5 star rating as a positive one. Any number less than 5 may harm your driver's service.

9. Each Uber account can only request one car. Someone else in your party will need to order the second car from another Uber account.

10. You cannot signup in US to get free ride in $ dollar and use in India. You will not get $20*66=Rs 1320/- in India. Don't try to fool the system by changing your location in mobile or browser to get such rides, you may loose your country ride also.

Share your story! How many free rides have you had and what problems you experienced with Uber car service. We'd love to know all about it? 

A Complete Guide to add Meta Tags to Each Blogger Post

Do you really getting enough organic search traffic results from search engines like Google, Bing or Yahoo, even though you have great unique quality content on your blog? Most of the people says "No" because there is something missing in your blog post i.e. Meta tags. 
A Complete Guide to add Meta Tags to Each Blogger Post
Meta tags are snippets of text that describe a page's content and don't appear on the page itself. The search engine crawlers find out the exact information of a webpage with the help of Meta tags. 


How to check Meta Title, Keywords and Description on blogger post

You can find out whether a given blogger post is using Meta tags or not by right click anywhere on the blog post and tap on "View Page Source". A pop up window will appear in Firefox (new tab will open in Chrome), now try to find meta tags at the top or head of the page.

The meta tags will look something like this 

check Meta Title, Keywords and Description

Also See : How to use Alt tags in Blogger Images

You can also use this website to check Meta tags on blogger post 

How to check Meta Title, Keywords and Description on blogger post

How to add Meta Titles, Keywords and Description to each Blogger Post

Go to your blogger Dashboard and click on Template. We recommend you to Backup Your Template before making any changes to your blogger Template. Click on Edit HTML > Proceed > Expand Widget Templates


Also See : How to Prevent Copying Your Blog Content


Now search for <title> tag and add the following code like shown in image. 

<b:if cond='data:blog.metaDescription != &quot;&quot;'>
    <meta expr:content='data:blog.metaDescription' name='description'/>
    <meta expr:content='data:blog.metaDescription' name='keywords'/>
 </b:if>
 <meta content='FOLLOW,INDEX' name='robots'/>

Note : You can also add this code just above </head> tag.

How to add Meta Titles, Keywords and Description to each Blogger Post


How to enable Search Description in Blogger
To enable search description, click on Setting Tab and tap on Search Preferences. Now enable search description, and enter the suitable keywords that describe your blog. 

Also See : How to Create High Quality Backlinks
 
When you publish new blog post, enter proper keywords in search description area that matches your blogger post content.

If you have any question about Meta tags, sound off at the comments section below.

A Quick Fix : 5 Common Smartphone Problems and How to Fix Them

A smartphone or a mobile phone is the one gadget most people cannot leave home without. It’s used by everyone no matter what age- Adults use their mobile phones to store important information, send emails and communicate with coworkers. Teenagers use mobile phones for access to the internet or social media. 


Common Smartphone Problems and How to Fix Them


Young or old, a smartphone has become a necessity. Unfortunately, our phones are also prone to damage and malfunction. Because of our constant use for it, we often don’t have time to go to a service center to have our phones fixed. What you don’t know is that some common smartphone problems can easily be fixed by you! So save yourself a trip to the service center.

5 common smartphone problems and how to fix them


1. Battery Problems: Every mobile phone needs a battery, without it, your smartphone will not work. The battery is also one of the reasons why we experience phone overheating. Have you found yourself thinking “why does my phone get hot?” or instances when you want to scream “my phone won't charge?” You are not alone. Battery problems are fairly common for all mobile phones.

2. Performance Bug: Have you experienced mobile hanging? Top Ten Problems says “Slow processing happens due to the less space in internal storage or may be some apps are used frequently. When needing a phone to work efficiently and what a user gets is slow processing. Slow processing may also occur due to the excess use of the apps that are heavy in storage. Proper optimizing and cleaning of apps can eliminate this slow processing problems.”

3. Storage- This is a common problem for iPhone users especially those who have purchased 16GB iPhones. Over time, you realize that you are in need of more storage space and unfortunately, you need to delete unused apps. Purge your mobile phone of photos, data and other information that you no longer need. If your mobile phone has a memory card slot then purchase memory cards in the form of microSD cards. Geek Squad UK says “The best way to gain the largest amount of free space on your smartphone is to add or upgrade a memory card. 


Also See : How to Expand Your Phone Storage with Wireless USB stick

Many Android and Blackberry handsets come with a memory card slot which take MicroSD cards as standard and are used for boosting the phone's storage capacity. If you are the owner of a Windows phone, a quick check of your manual should confirm whether additional storage can be added (support for MicroSD cards was brought in with the Windows Phone 8 handsets). If you are the owner of an iPhone, the amount of available memory is decided when you purchase the handset and cannot be expanded any further.”

4. Weak or No Signal:  When your smartphone all of a sudden, is unable to receive calls or messages and the signal indicator shows weak or no signal then worry not! In most cases, the problem lies with your data provider or the area coverage. Sometimes we enter rooms or fall into places where signals are really weak. A quick solution to this is to do a quick restart and soon, all your messages will come in again. Alternatively, you can also move to an area where there’s improved signal strength. There are many factors that could disrupt signal strength and moving to another area could easily solve your problem.


5. Cracked Screens or Immersion in Water: Accidents happen and unfortunately water and electronics are not a good mix as well as your smartphone taking a tumble down the staircase. Sometimes these accidents can be prevented with the help of sturdy mobile phone cases. They may be expensive but investing in mobile phone cases can save your phone from a cracked screen or from water entering its ports. Another failsafe protection for your smartphone is gadget insurance.

Have you experienced any of these common smartphone problems? What solutions did you take in order to fix it? Share your ideas and experiences in the comments section below.


                                      Author’s Bio: 


Joel Ekstein

Joel Ekstein is an eCommerce retail expert with over 12 years experience in the industry. He has had experience in buyer and inventory forecasting, marketing, and expanding customer base in new markets. www.protect-o.com | twitter.com/Protect_O

Common Troubleshooting Tips For Your iPod

Music plays a big role in my life. I listen to music in the shower, I play a little Bruce Springsteen while doing dishes and I even listen to the Star Wars theme song when stuck in traffic. I feel that music can greatly affect a person's mood. A certain jingle can make a commercial sell, a well created musical score for a movie can elevate our viewing experience and most of all, music can express what words cannot say. 

Common Troubleshooting Tips For Your iPod


Even science can explain why music is important: Michael D. Lemonic of Time Magazine writes " … in the latest issue of Science, Salimpoor, now a neuroscientist at McGill University in Montreal, reports, along with several colleagues, that music triggers activity in the nucleus accumbens , the same brain structure that releases the “pleasure chemical” dopamine during eating (and, on a darker note, drives addicted behavior as well)." It’s no wonder why the iPod became a hit.


Common Troubleshooting Tips For Your iPod

In October 2001, Steve Jobs released the first ever iPod. Although this was met with criticism because of it's price and minimal features, the world of MP3 was never the same. Since then, every year Apple would release new models and was greatly accepted by everyone as THE music player must have. Everyone knew what an iPod was and Apple created what we know now as the most purchased MP3 player in the world. In 2008, over 100 million units have circulated globally and has become a staple MP3 that music lovers own. There are now over 24 models of the iPod and Apple has shown no signs of stopping in creating and developing their breakthrough product.

Unfortunately, the iPod has come with a few common problems. I've gathered user experiences on how to combat these problems. Here is a list of the top common problems of the famous MP3:
 
iPod won't turn on

When you Google the words common iPod problem, this will definitely be on top of the list and after reading dozens of forums regarding this problem, it seems that the solutions that have worked for others are simple: make sure the hold switch is not turned on, make sure the battery is charged and lastly, reset your iPod (if you're not sure how to do this, see #3.)
 

iPod won't charge

Since your iPod is an electronic gadget, it will need juice to keep things running smoothly. This means regularly charging your iPod. So what happens when all of a sudden, your iPod won't charge?  The solution is simple: Clean your charging port!

According to Wonder How To, "It's something so freaking simple, yet, most of us would probably never think about it. A lot of dirt, sand, lint, and other debris can get jammed up in that Lightning port, and it will prevent the contacts on the Lightning connector from hitting their marks inside the port. If you have an iPad, iPhone, or iPod touch that suddenly stopped charging, clean all of the junk out of the port using a small tool. A toothpick works well, or the SIM card remover that came with your device (sans iPod touch and Wi-Fi only iPad models)."


How to reset an iPod

When all else fails, always go for a hard reboot. A little reset to your iPod can solve what you thought was the end of your iPod! If you're still using the click wheel iPod, simply toggle the hold switch from off to on, press and hold the Menu and Center buttons at the same time until you see the Apple logo. If you're using the iPod nano, hold the Sleep and Volume down button at the same time until you see the Apple Logo.

If this still does not work, I'd suggest you go to your nearest Apple Store and get it checked stat!

So what's next for the iPod? There's no doubt that the iPod has set the bar for MP3 players but smartphones have slowly taken over since most phones are capable of storing music. In my opinion, Apple needs to up their game with their iPod models. I'm sure there has been a drop in sales recently since most people use their smartphones to store music. If Apple wants to keep selling iPods, they need another breakthrough because if not, I can see iPods slowly becoming the thing of the past.

Share your story! How many iPods have you had and what problems have you experienced with it? We'd love to know all about it? The greatest question everyone's asking is: Do you still use your iPod or do you already store music onto your smartphone? Sound off at the comments section below.


                               Author’s Bio
Joel Ekstein

Joel Ekstein is an eCommerce retail expert with over 12 years experience in the industry. He has had experience in buyer and inventory forecasting, marketing, and expanding customer base in new markets.  www.protect-o.com | twitter.com/Protect_O

5 Best Ways to Access Blocked Sites

Internet is the best source of information but at the same time, many countries have banned websites on the behalf of security, culture etc and peoples can't access them. Is your school, college or office blocking you from getting on social network websites like Facebook, Myspace, Friendster etc. 

5 Best Ways to Access Blocked Sites

Here are some best and easiest ways you can bypass the restrictions and surf like normal, but please check with your local authorities before using them. We will not held any responsibility if you’ve breach the regulations of any.

1. Using a VPN Service: Virtual Private networks route the traffic via their servers and hence you will be able to access these sites even if they are banned in your country. There are many free and paid VPN services available for Windows and also mobile devices. All you need to do is to install the VPN service provider’s app and get started. 

Please note, some of the VPN service providers may be blocked in certain countries, so you need to check if it is accessible in your location. We have compiled a list of best VPN service providers here.

VPN Book, Hide.Me, Finch VPN, Hotspot Shield, CyberGhost, FreeVPN.Me, ProXPN, SecurityKiss, Its Hidden, Hideman, Froot VPN, iVPN, HideIPVPN, USA IP, ibVPN, VPN Reactor, TunnelBear, TorVPN, SpotFlux, GetVPN.

2. Using Proxy Websites: There are lots of proxy websites offering free access to blocked websites. These sites offer free browsing by just entering the URL of the website you want to navigate to. Since the traffic is routed through a proxy server, it is advisable not to share your username or password for sites requiring them.


3. Using IP to access the website: Each of the websites has their own IP address and ISPs might have blocked the website based on URL and not IP address. So you might be able to access the website via IP address. There are lots of websites which provide you with the IP address of any website. So once you have got the IP address, just type it in the address bar instead of the URL and you will be able to access it.

Access blocked website using cmd


You can also get the IP address by using the command prompt by typing ping www.baatkar.com. Replace "baatkar" with the name of blocked website. Here 74.125.203.121 is the IP Address of the website.


4. Using Tor Browser: Tor is free software and an open network that helps you defend against traffic analysis, a form of network surveillance that threatens personal freedom and privacy. So this browser surfs anonymously, so you can access any blocked websites using this browser.

5. Using Google Translate: Google Translate as the name indicates allows you to translate text or website from one language to another. Now here if you enter the website which is already in your language, Google translate will show error, so instead you need to select any language to translate it. Once the translate is complete, you get an option to view the original website.

There are many other ways to access blocked websites like Google Cache, Internet Archive-Wayback Machine, Use Proxy in Browsers, Retrieve Web pages via Email, Subscribe to RSS feed etc..but we listed the best and easiest ways to access the blocked websites. 

How to Format a Write Protected USB stick

If you're stuck with a USB drive or SD card that can't be format or the disk is write protected. You'll find that an USB flash drive or SD card will refuse to format and Windows will tell you that it is write protected, ever through there is no format option. Sometime the things get out of control and you can read the files which are already stored on the drive, but you can't delete them. 


Formatting a USB drive is not different than formatting any other drive. Here are some simple methods you can try to remove write protection and erase or format it. 


Difference between FAT32, exFAT and NTFS

1. FAT32 is the oldest file system and introduced all the way back in Windows 95 to replace the older FAT16 file system. Most of the Flash drive will often come formatted with FAT32 for maximum compatibility across not just modern computers but other devices like game consoles and anything with a USB port. There are some limitation like Individual files on a FAT32 drive can't be over 4 GB in size and lacks the permission and other security features built into the more modern NTFS file system. 

Compatibility: Works with all versions of Windows, Mac, Linux, game consoles, and practically anything with a USB port.

Limits: 4 GB maximum file size, 8 TB maximum partition size.

Ideal Use: Use it on removable drives for maximum compatibility with the widest range of devices, assuming you don’t have any files 4 GB or larger in size.

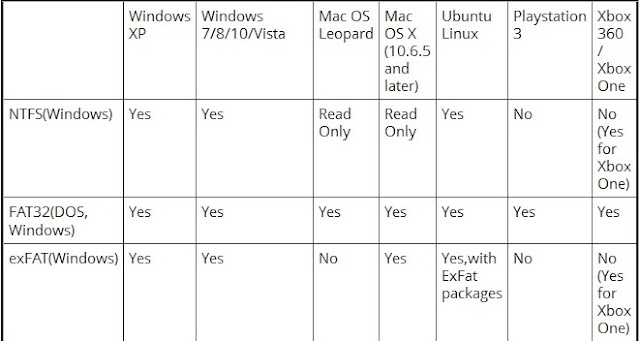
NTFS FAT32 file size limit


2. NTFS file system was introduced in the consumer version of Windows XP and packed with modern features like support file permission for security, a change journal that can help quickly recover errors if your computer crashes, shadow copies for backups, encryption, disk quota limits, hard links etc. 

Compatibility: Works with all versions of Windows, but read-only with Mac by default, and may be read-only by default with some Linux distributions. Other devices — with the exception of Microsoft’s Xbox One — probably won’t support NTFS.

Limits: No realistic file-size or partition size limits.

Ideal Use: Use it for your Windows system drive and other internal drives that will just be used with Windows. 

NTFS FAT32 compatibility with OS


3. exFAT was introduced in 2006 and was added to older versions of Windows with updates to Windows XP and Windows Vista. It's a file system optimized for flash drives and has very large file size. You can store files that are larger than 4 GB apiece on a flash drive or SD card. exFAT is a strict upgrade over FAT32, and should be the best choice for external drives where you want a lightweight file system without FAT32’s file size limits.Compatibility: Works with all versions of Windows and modern versions of Mac OS X, but requires additional software on Linux. More devices support exFAT than support NTFS, but some — particularly older ones — may only support FAT32.

Limits: No realistic file-size or partition-size limits.

Ideal Use: Use it for USB flash drives and other external drives, especially if you need files of over 4 GB in size. Assuming every device you want to use the drive with supports exFAT, you should format your device with exFAT instead of FAT32. 

How to Format a Write Protected USB stick

In any version of Windows from XP onwards, run Regedit.exe and Navigate to the following key

Computer\HKEY_LOCAL_MACHINE\SYSTEM\CurrentControlSet\Control\StorageDevicePolicies


Double-click on the WriteProtect value in the right-hand pane of Regedit.exe. Change the Value data from 1 to 0 and click OK to save the change. Close Regedit and restart your computer. Connect your USB drive again, and you should find it is no longer write protected. You can now format the drive as normal by right-clicking on it in My Computer and choosing Format.