How to Access Files on Computer From Anywhere

You all have important documents, photos and files on home computer. How can you "Remotely access" these files from your office computer or your mobile phones. The simplest would be that you can copy all your data from the home computer into a Portable Hard Drive. 


Home groups and network file sharing make it easy to access your Home computer files from another PC on the same local network, but accessing your PC's files over the internet takes a bit more setup. There are many ways to make files available over the Internet. The real challenge here is finding a secure, easy-to-use solution.


How to Access Files on Computer From Anywhere

There are many ways by which you can retrieve files stored on your home computer from anywhere else using a regular Internet connection.

Method 1 : Access Files Directly through the Browser

Home Pipe : This is an easy and free service that lets you access your home computer files and media from any other Computer or mobile phone. Install the HomePipe Agent and all files on that computer will instantly become available through the web. They also have apps for iPhone and Android phones. 

Windows Live Sync : Just install the Live Sync client on your computer and you can then access the entire hard drive of that computer simply through the Windows Live Sync website.

GBridge : By using this you can setup a virtual private network using your existing Google Account. 

Opera Unite : you can easily turn your computer into a web server and instantly access files and folders on that computer from any other web browser (including that of mobile phones). Opera Unite is a standard web server and therefore you’ll be downloading files directly from the computer – they’re not uploaded anywhere else.


Method 2 : Using Desktop Sharing Software

Google Desktop : This is a popular desktop search software that you may use to find emails, documents and other files on your Windows computer.

TeamViewer : The ideal solution for remotely accessing a PC, whether you’re accessing your own PC or performing remote tech support. Just select the File transfer option when connecting to a remote PC. You’ll be able to move files back and forth between the two PCs. Set up TeamViewer for unattended access and you’ll be able to do this as long as the remote PC is online.

TeamViewer runs on Windows, Mac, and Linux. You can also use the File Transfer feature from the TeamViewer Android or iOS apps. This is an easy-to-use, cross-platform solution. You don’t have to worry about forwarding ports or exposing server software to the Internet and securing it yourself.

UltraVNC : You remotely access your computer files from anywhere else.  LogMeIn Pro is another good option for transferring files from a remote computer but these are paid services.

Windows : If all your computers are running Windows, you can use the built-in remote desktop connection feature of Windows (available in XP and later) to access your home computer from another Window computer over the Internet.

Method 3 : Using Online Backup Services

Sky Drive and  Dropbox : These online backup services provide desktop utilities that will automatically upload files on your home computer to the Internet and you can then access these files through the web browser of any other Internet connected computer.

SugarSync and Carbonite :  By using these services, you can access files from any mobile phone as well computer. 

Method 4 : FTP Servers and Other Server Software

You could install an FTP (file transfer protocol) server on your computer and grant access to it from the Internet. This isn’t really ideal from a security perspective, as you’d have to expose the FTP server to the Internet. (You could also set up both a VPN and an FTP server, accessing the FTP server through the VPN.)

How to Open and Read DAT Files in Windows

Quite often we might have seen the files with extension called .DAT. These files might be common when you receive attachments in email. When you try opening these files, Windows tells you that it is not able to open the file. So what are .DAT files basically and how to open and read these type of files in Windows? Let’s find out in this article.

.DAT files are basically data files and many programs like excel, Word, some video CD files also use DAT. It basically says that it hold data, but can be created by any program which uses this type of extension.

So how to open and read it? That’s a tricky thing! .DAT files are created when the program using such files might have been used. Say for example a person uses Excel, the program automatically generates a DAT file. Now if you get a .DAT file in attachment in email and the conversation is about an excel sheet, you know the .DAT file can be opened using Excel.

The best way to open .DAT file is using the program which created it, but not often you know which program created it. You can also try double clicking on the DAT file and see if Windows can recognize the format automatically. At times it might be able to open it automatically. Please note, when opening DAT files received through email, make sure you scan it for any viruses or threats.

Another way to find out which program created the DAT file is by opening the DAT file using Notepad. Notepad, although can open all files including video and music files, it will show junk data if it is different kind of file. But at times, you might be able to pick some information on the .DAT file from Notepad and this can be regarding the software which created it or the actual file which uses it.

If the .DAT file is associated with a video, then probably you can try tools like VL Player or VCD Gear to see if it is able to open it.


Another method is by changing the extension of .DAT file to the file which you think it could be related to. If you get .DAT in attachment you can possibly try changing the extension to .doc or .xls or even .jpg or .PNG to see if it is a document or image. If you want to change the extension of files, you need to enable “File name extensions” in the file menu in the Windows Explorer (Windows 8.1).

You can also right click on the .DAT file and try Open with.. menu and see if any of the programs is able to open it properly.

Best Free Antivirus for Window 10

If you have been using Windows for long time now, most of us use antivirus tools to protect the PC from viruses, malwares, spywares and other online threats.


Best Free Antivirus for Window 10

Although Windows 10 does come with in built protection in the form of Windows defender, you can also protect the PC with third party anti virus tools available for download. Many of these apps offer free antivirus solutions compatible with Windows 10. Here is a list of best antivirus tools you can use on Windows 10.

1. Avira Antivirus Free :

Avira Free Antivirus 2015 provides comprehensive protection against all types of threats, secures your data, protects your privacy and ensures your PC remains virus-free. The software has industry-leading antivirus secures your data, protects your privacy and blocks all types of malware, including viruses, worms, Trojans and spyware.

The tool also features real time cloud scanning which analyzes unknown files in the cloud.

Also See : How to Setup a USB Flash Drive to install Windows 

2. Avast Free Antivirus:

Avast is one of the most popular free antivirus tools for Windows and it is now updated to support the latest version of Windows. The tool is free and is incredibly easy to install, simple UI and lightning fast virus scans makes it a perfect choice for most Windows users.

The free version comes with antivirus and anti-malware protection along with home network security and also browser protection from hackers. This should be pretty good enough for most users and in case you want more features, you can upgrade to Internet Security tool.

3. AVG Free Antivirus:

AVG Free Antivirus 2015 is yet another popular antivirus tool for Windows 10. It can blocks viruses, spyware, & other malware on you PC and it can also scan web, Twitter, & Facebook links. The tool also comes with email protection which warns you of malicious attachments.

The user interface is also pretty good and is one of the most effective in removing threats from malware-infested test systems.

Also See : How to Access any Blocked Website

4. Panda Cloud Antivirus:

Panda Cloud is yet another free antivirus solution for Windows 10 which offers protection against viruses, spyware, malware. It also comes with rescue kit which will disinfect your PC in critical situations. The antivirus comes with real time protection and has Url & web filtering with behavioral analysis protection. 

5. Sophos Home

It is a free commercial grade antivirus solution for your home PC. It can protect your Mac and Windows PC in your home from malicious software, inappropriate websites and viruses. It uses the same award winning technology that IT professional trust to protect their business system. One of the features of the software is the you can do a lot of control from the web browser. The free version for non-commercial usage lets you protect up to ten computers per account.

Best Online Anti Virus File Scanners

We download a lot of files on the internet and many of them are documents, text files, exe files, videos and music files. But not all files downloaded are safe, they might be viruses, malwares, spyware and more. A lot of users have anti-virus and anti malware apps installed and you can scan the file before you open it. But in case you do not have such an option to check the files after they are downloaded, you can always use online scanner and you will not have to install them on your Computer.


Online scanners can scan you file without having to install anything. You can either scan files by specifying an URL or upload the file. You need a proper internet connection to scan the files online. So here is the list of online scanners.

1. Virus Total:

VirusTotal is a free service that analyzes suspicious files and URLs and facilitates the quick detection of viruses, worms, trojans, and all kinds of malware. You can either upload a file or use the URL to scan the file. The upload size of the file is limited to 128MB. VirusTotal will scan, and detect, if appropriate, any type of binary content, be it a Windows executable, Android APKs, PDFs, images, javascript code, etc. You can email the file to Virus Total to scan it.

Overall, Virus Total is one of the popular sites to scan files online.

2. Meta Scan:

Similar to Virus Total, Meta Scan can also scan file by uploading it. You can upload files upto 140MB is size and it is scanned by 44 anti malware engines. There is a hash checked to see if the hash has been compromised by entering the MD5/SHA1/SHA256 checksum. You can also scan an IP address using the service.

3. IObit cloud:

IObit cloud is yet another online service which allows you to scan files by uploading them. IOBit Cloud uses latest cloud computing technology and Heuristic Analyzing mechanic to analyze the behaviour of spyware, adware, trojans, keyloggers, bots, worms, hijackers and other security-related risks in a fully automated mode.

4. Scan This:

ScanThis is free online virus scanning tool which allows you to upload or point it to the URL of the file you wish to scan and the service let you know if it is infected with any known malware or virus. ScanThis is powered by the open source and industry-recognised Clam AV software.

5. Jotti’s malware scan:

Jotti’s malware scan is a free service that lets you scan suspicious files with several anti-virus programs. You can submit up to 5 files at the same time. There is a 50MB limit per file and the file is scanned by almost 20 antivirus companies so you know the file is safe once you get the result. You can see the results from all the antivirus services on whether it has passed the scan.

How to Enable God Mode in Window 10

GodMode was first discovered in Windows 7 as a hidden feature and when enabled, it could provide access all control panel options in single folder. Basically, the ‘GodMode’ is a folder which has a special name to it and provides access to all the control panel settings in single page. This is pretty useful as you do not have to search for options in control panel and you get quick access.


How to Enable God Mode in Window 10

GodMode feature is also available in Windows 10 and you can enable it by creating a new folder.


Right click on desktop and click create new folder. Now in the name for the folder type the following code.

GodMode.{ED7BA470-8E54-465E-825C-99712043E01C}

Press enter and this will turn the folder in GodMode. Now open the folder and you will see all the control panel items.

You can see that the folder has an icon of the control panel. In the code above, you can replace the ‘GodMode’ with your text, but the rest of the code should be intact.

How to Create a Recovery Drive in Window 10

Windows 10 is the latest OS from Microsoft and comes with some great features and is available for upgrade from Windows 8.1 or Windows 7. Now, there are many cases where your Windows 10 installation might have issues booting or it might have crashes or even system files getting corrupted. If you run into problems with your PC, a USB recovery drive can help you troubleshoot and fix those problems, even if your PC won’t start.


How to Create a Recovery Drive in Window 10

If you have bought a new PC, it might have come with a recovery image that’s used to refresh or reset your PC. The recovery image is stored on a dedicated recovery partition on your PC, and is typically 3-6 GB in size. To save space on your PC, you can delete the recovery image from your PC and use a recovery drive instead. Windows 8.1 includes a built-in tool to create a USB recovery drive. Windows will let you know how big the recovery partition is, and you’ll need a USB flash drive at least that big.

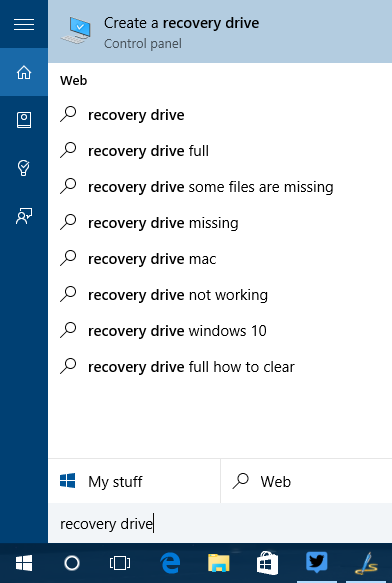
To create a recovery partition, click the start menu and type recovery drive. You will see the option in the control panel.


Once you click this, it will open the wizard to create a recovery drive. Here you can either create a recovery drive to troubleshoot or backup system files so that you will be able to reinstall Windows.


Click next and you will shown the size of the USB drive you need to create the recovery partition. Insert the USB drive, make sure that you have backed up all the files in USB drive as it will be deleted when the recovery drive is created.

Once the process is complete, you can use this drive to fix issues in Windows 10.

How to Create a Wi-Fi Hotspot in Windows 10

When you are using a wired connection on your PC or using a USB connection with your 3G or 4G LTE dongle, you can share this connection to other devices. This means you can connect other smartphones, tablets and even laptops to this connection by creating a portable wireless hotspot on Windows 10. There is no direct UI to create the hotspot, but you can easily do it using few commands.


How to Create a Wifi hotspot in Windows 10

To get started, right click on the Windows start button and click Command prompt (admin). This will open the command prompt in administrator mode.


Now type the following command;

netsh wlan set hostednetwork mode=allow ssid=AdHoc key=password

In the above command, you can add your own value for SSID and enter your key. Now press enter.


Now to start the network, type the below command;

netsh wlan start hostednetwork

Now that ad-hoc connection is created with passkey, you need to share the existing connection.


Once the hosted network is enabled, you can see MyWiFi connection listed in the network and sharing center. Now the network needs an internet connection and for this, you need to share the existing active Internet connection. Right click on your existing internet connection and select properties.


Now select the Sharing tab in properties. Check the box against “Allow other network users to connect through this computer’s internet connection”. Then select the newly created Wi-fi connection from the drop down list. Now save the details and close the properties.


Now you can see Internet available on the new hotspot connection created.


In case you want to stop the hosted network, use this command;

netsh wlan stop hostednetwork

If you find this method difficult, you can probably use tools like Virtual Hotspot, Connectify or mHotspot.

How to Upgrade to MIUI 7 on Xiaomi Phone

Xiaomi had showcased the global launch of MIUI 7, the latest version of their ROM. There are quite a lot of new features in MIUI 7 and we had detailed the new features of the new version of MIUI. 


How to Upgrade to MIUI 7

1. First step is to backup your devices for all the personal files. Although the upgrade will NOT wipe your storage, it is always safe to do a backup of your files. You can connect your phone to PC and then take a backup.

2. Once you have done the backup, you need to download the MIUI 7 ROM from here. (update: download links below). Select the Mi phone and you will see the developer build for this phone which is version 7 of MIUI. MIUI 7 is available for all Xiaomi devices including MI Note, Mi4, Mi4i, Mi3, Redmi Note, Redmi 2.


3. Now copy the downloaded ROM to the internal storage of your device. Open the Updater app on your device. Click on the three dots at the top right corner of the updater app and click “Choose Update Package”


4. Now browse for the ROM which you have copied to the phone. Now confirm you want to upgrade. After choosing the right ROM file, your device will begin upgrading. Your device should automatically boot to the new version when the update is completed.

Now your phone will have MIUI 7 installed.

Download Links:

Mi3- http://bigota.d.miui.com/5.8.22/miui_MI3WMI4WGlobal_5.8.22_f7b3c74238_4.4.zip


Mi4i- http://bigota.d.miui.com/5.8.22/miui_MI4iGlobal_5.8.22_82e7a89700_5.0.zip


Mi4http://bigota.d.miui.com/5.8.22/miui_MI3WMI4WGlobal_5.8.22_f7b3c74238_4.4.zip


Redmi 1S- http://bigota.d.miui.com/5.8.22/miui_HM1SWCGlobal_5.8.22_68a70cba0f_4.4.zip


Redmi 2- http://bigota.d.miui.com/5.8.22/miui_HM2XWCGlobal_5.8.22_c1f3e5fe71_4.4.zip


Redmi Note 4G- http://bigota.d.miui.com/5.8.22/miui_HMNoteLTEGlobal_5.8.22_acefdc2fc7_4.4.zip


Redmi Note 3G- http://bigota.d.miui.com/5.8.22/miui_HMNoteWGlobal_5.8.22_bcb694c042_4.4.zip

How to Repair Window 10

Windows 10 comes with lots of new features including the new start menu, Cortana, the new browser called Edge and more. Windows 10 also comes with improvements in performance. Now if you are using Windows 10 and facing any issues, you can repair Windows 10 without having to install it again. In this post, we will detail the various options available.


How to Repair Window 10

To get started with the repair process, there are two ways to start it. If you are able to boot into Windows, but having issues with Windows, you can go to Settings-> Update and Security-> Recovery-> Advanced Start up. This will restart Windows and boot into repair menu.


The advanced start up is using a USB drive or DVD and change Windows files to repair it. In case you are not able to boot into Windows 10, you can use the bootable Windows 10 DVD and then click on the “Repair your Computer” option in the boot menu.


This will provide you with more options. Click on Troubleshoot menu.


Here you will have the option to Reset the PC, this will re-install Windows and you have the option to select which all files you want to keep. Click on the advanced options.


Here you have the following options.


1. System Restore:

If you have created restore points, you can restore the PC to earlier state using them. If you do not have any restore point, you can skip this option.

2. System Image recovery:

This is useful if you have created a recovery image of your PC when it was in goo condition, without any issues. Again this works only if you have the recovery image.

3. Startup Repair:

If you Windows 10 is not booting up, start up repair will be able to solve most of the issue. This process is automatic and Windows 10 installer will check your PC for any start up issues and fix it.

4. Command Prompt:

This option is useful if you know advanced troubleshooting with command prompt and this is not for novice users.

5. Start up Settings:

Here you will be able to change the start up settings for booting Windows 10

6. Go back to Previous build:

This it the downgrade process and you can go back to Windows 8.1 or Windows 7 from Windows 10. This option will be available only in the first month of upgrade and in case you have cleaned up files after the upgrade, this will not work.

So in case you are having issues with Windows 10, you can try any of these options to repair it.